Your brand’s typography is a huge part of its identity—it sets the tone, adds personality, and makes your website stand out. With Showit, you’re not limited to a default set of fonts; you can upload and customize your own to match your brand perfectly. If you’re ready to take your website’s typography to the next level, here’s everything you need to know about adding and editing Showit custom fonts.
Adding Custom Fonts to Showit
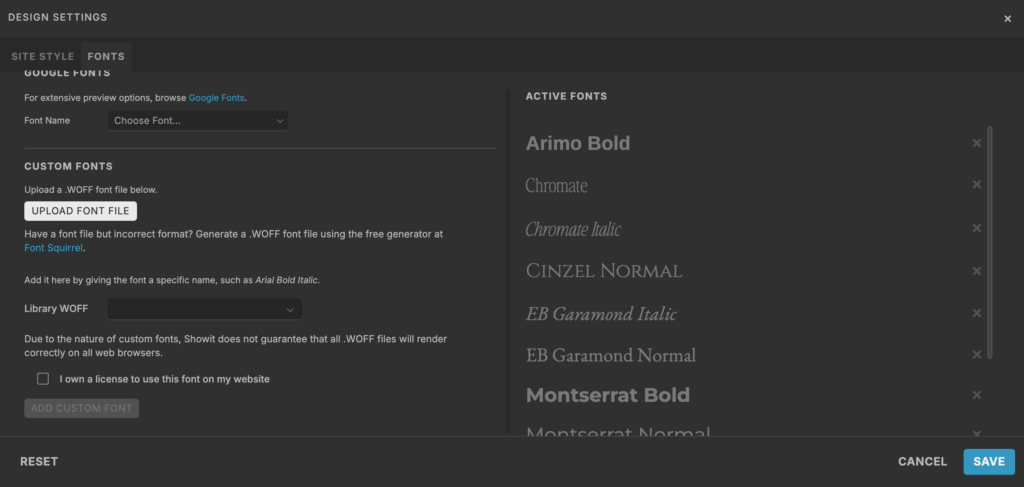
Before you can use your custom fonts, you need to upload them to Showit. This is a simple process, but it’s important to have the correct font files in .WOFF format (if you don’t have that format you may have to purchase a specific license for it or you can use Font Squirrel webfont generator). Here’s how to do it:
- Go to Design Settings: Open your Showit dashboard and navigate to the “Design Settings” panel.
- Click on the Fonts tab: This is where you’ll manage all the fonts available on your site.
- Upload your custom font files: Click “Upload New Font” and select your font file from your computer. Make sure you have the correct font license to use the font on your website and check the box to signify that you do.
- Name your font: Give your font a clear name so you can easily find it when applying it to your site.
Once uploaded and named you can hit save to save the settings, then your custom font will be available to use across your entire site.
Applying Custom Fonts to Your Website
Now that your font is uploaded, it’s time to put it to use. Whether you’re updating headers, body text, or call-to-action buttons, here’s how to apply your custom font:
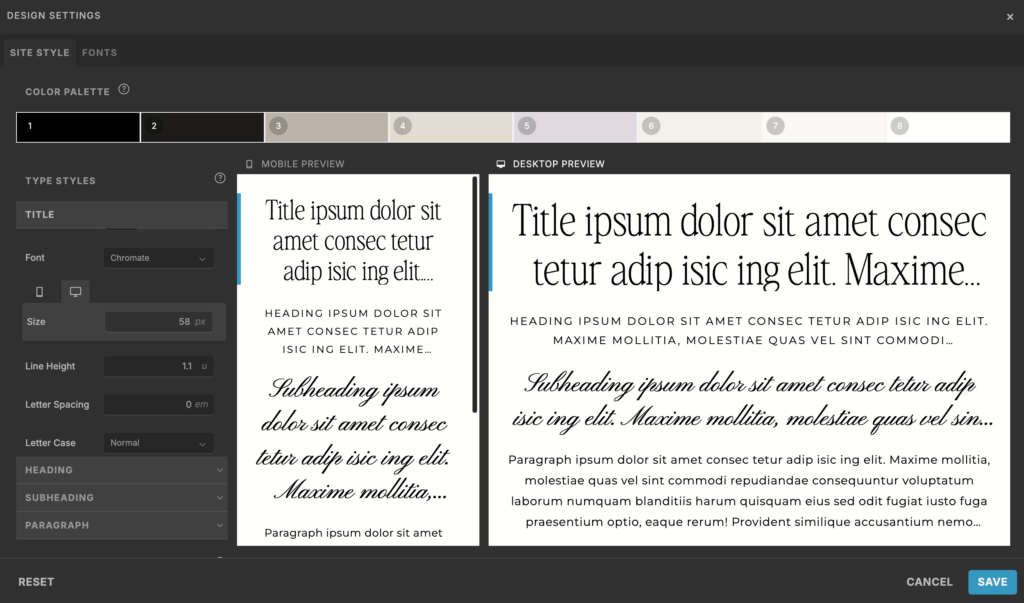
- Edit your Font Settings: In the “Design Settings” panel, go to the site styles tab to set your font styles for headings, subheadings, and body text.
- Use the Text Properties panel: When editing individual text elements in a canvas, select your uploaded font from the right-hand text styles menu under “Font.”
- Keep it consistent: To maintain a polished look, make sure you’re using the right fonts in the right places. Typically, brands stick to 2-3 fonts max—one for headings, one for body text, and sometimes an accent font. This step ensures your website looks professional and aligns with your brand identity.
Fine-Tuning Your Font Settings
Showit gives you plenty of control over how your fonts appear, allowing you to adjust size, spacing, and style. Here are some key settings to fine-tune your typography:
- Font Size & Line Height: Make sure your text is easy to read by adjusting the size and spacing. Headings should be bold and eye-catching, while body text should be comfortable to read.
- Letter Spacing & Weight: Need to make text stand out? Play around with letter-spacing (tracking) and font weight (thin, regular, bold, etc.).
- Mobile-Specific Adjustments: Sometimes fonts need to be resized or adjusted for mobile screens. Use Showit’s mobile preview to make sure everything looks great on smaller devices.
These small tweaks can make a huge difference in the readability and visual impact of your site.
Recap
Custom fonts are a simple yet powerful way to make your Showit website feel uniquely yours. By uploading your chosen fonts in the Design Settings panel, you ensure that your brand’s typography stays consistent across your site. Once uploaded, you can apply them to your headings, body text, and other elements, keeping readability and aesthetics in mind. Fine-tuning font details like size, spacing, and weight helps create a polished, professional look that works seamlessly on both desktop and mobile. Taking the time to get your fonts right will elevate your brand and make your website feel more intentional and cohesive.
More Resources
- Showit Crash Course: A 5-minute intro on how to use Showit
- Showit Design Settings 101: Customizing Your Template’s Design
- Understanding Showit Canvases: The Building Blocks of Your Site
- Getting Started with Showit: Navigating the Showit Interface
- Understanding font licensing and legally using fonts on your website
- Website Planner + Content Workbook
- FREE Website Image Guide
- Showit website templates
Save for Later
Enjoy this article and find it helpful? Pin this image on Pinterest so you’ll always have this info on hand!